: The executable usually requires administrative privileges to access COM ports.
[Power Off MiFi] ➔ [Hold Boot Key] ➔ [Connect USB] ➔ [Load Firmware] ➔ [Click Start] Flashing Instructions Run the Marvell MiFi Tool on your PC. Click the or Load button.
The tool is specifically built for MiFi devices using Marvell LTE chipsets. Some well-documented compatible models include: Airtel Vida M2 (M022 / M022T) and L02C17XXXX How to Use the Marvell Mifi Tool
: Features a drop-down menu to manually select the correct COM port if the "Marvell AT Interface" is not automatically detected.
Release the keys when the PC plays the device connection chime. Step 4: Run the Flash Tool Marvell Mifi Tool V1 40 0 Download
Check specialized forums like Hovatek for the latest "patched" versions.
Version 1.40.0 introduces several stability updates over older builds like V1.0.0 or V1.2.0. 🔌 Improved COM Port Detection
Locate the IMEI input fields within the tool interface. Carefully type the 15-digit IMEI found under your device's battery cover. Click Write IMEI or Apply . Step 5: Finalize and Reboot
Select your specific device firmware file (.bin or .bin package). Power off your MiFi device completely. Hold the device boot button (usually Power + Reset). Connect the device to the PC via USB. Verify the tool detects the COM port. Click to begin the flashing process. Wait for the "Success" or "Pass" message. Disconnect and reboot your mobile hotspot. Troubleshooting Common Errors Device Not Detected Swap the USB cable for a different one. Move the cable to a motherboard USB port. Reinstall the Marvell USB drivers. Flashing Fails at 0% Ensure you are using the correct firmware version. Run the tool with Windows Administrator privileges. Disable Windows Defender temporarily during the flash. Share public link The tool is specifically built for MiFi devices
Scammers know the demand is high. Many links promising the "V1.40.0" download actually lead to survey scams, paywalls, or dummy files.
Only useful if you have a compatible Marvell-based MiFi device and understand the risks of unofficial tools. For casual users – avoid. For technicians – scan with VirusTotal before use, and always back up original firmware.
Before downloading the software, ensure your environment meets the necessary system requirements to prevent connection drops during critical operations. Requirement
Unlocking a MiFi device is a two-part process involving flashing firmware and using the Marvell tool. Phase 1: Preparing the Modem Step 4: Run the Flash Tool Check specialized
The remains an essential resource for reviving old 4G hotspots, unlocking carrier-locked dongles, and performing low-level maintenance on Marvell chipsets. By following this guide—using only trusted sources, respecting legal boundaries, and preparing proper backups—you can safely harness this niche but powerful utility.
Remember: The right firmware file is just as important as the tool itself. Join a dedicated GSM forum community to find verified firmware packs for your specific device model.
This article provides a comprehensive breakdown of the , including its features, safe download sources, installation steps, and critical usage warnings.
To flash firmware, click the or Browse button, locate your device's specific firmware configuration file, and click Upgrade/Write .
The Marvell Mifi Tool is typically used for configuring and managing Marvell-based MiFi (Mobile Wi-Fi) devices. These devices are used to create mobile hotspots, allowing multiple devices to connect to the internet via cellular networks.
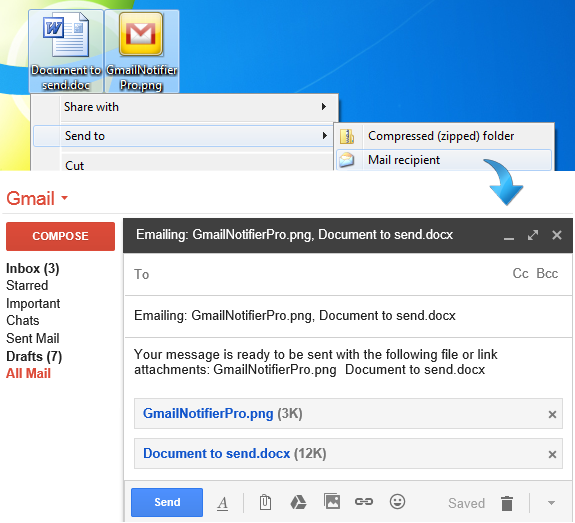
Gmail Notifier Pro can be registered as default program for e-mail in Windows. When registered as default e-mail program in Windows, the task of sending e-mail attachments from Windows, Office or any other applications becomes easy.
The screenshot illustrates the Send To feature that is available for all files and folders in Windows. By selecting one or many files, selecting Send To - Mail recipient, Gmail Notifier Pro Gmail can be opened in the web browser with a new message prepared, including the selected files as attachments. This integration increases the productivity for Gmail users.
Gmail Notifier Pro also have a built-in e-mail composer that can be used for sending messages. The Send To feature can either be used with Gmail in the web browser or the Gmail Notifier Pro composer.
Gmail Notifier Pro also supports mailto-link integration, and can either launch the Gmail composer or the Gmail Notifier Pro composer when a mailto-link is clicked.
Supports 32-bit & 64-bit Windows XP, Windows Vista, Windows 7, Windows 8 and Windows 10.
Gmail Notifier Pro can can be used as an e-mail client, with support for all common message operations, including send e-mail, reply, preview and save attachments, mark as read or delete messages.
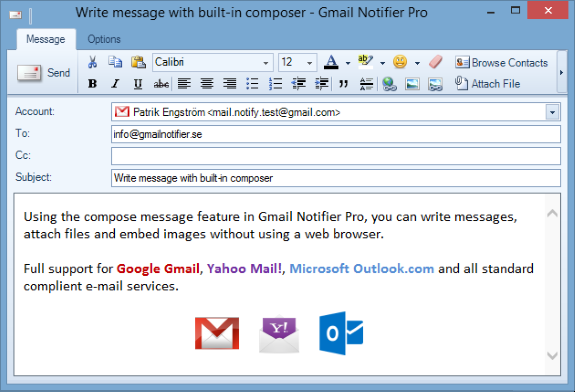
The screenshot illustrates the e-mail message composer in Gmail Notifier Pro.
Gmail Notifier Pro has preconfigured settings for all major e-mail service providers, making it easy to get started. Gmail Notifier Pro can also be used with any standard IMAP or POP mail server. For Google, messages can be accessed using Atom in addition to IMAP.
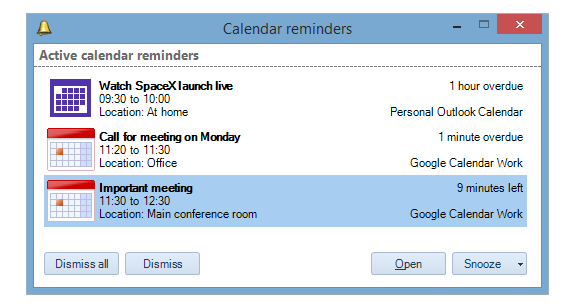
Gmail Notifier Pro can connect to Google Calendar and Microsoft Outlook.com Calendar in order to get information about calendar events and display reminders.
The screenshot illustrates the calendar reminders. These reminders will popup on the Windows desktop to notify about the events.